Google Sheets - Bulk Uploader
Apps Script
Apps Script is cloud-based JavaScript platform for integration and automation. In this example we will add a script to a google sheet. This is done by selecting Extensions > App Scripts from the menu bar.

After selection the user is taken to a new browser tab containing the JavaScript editor for creating the App Script.
This sample application is intended to demonstrate how to use Google Sheets Apps Script to access the Shipwell API to perform a bulk upload of customer data into the Shipwell platform. It uses the auth/token/ and the /brokerages/{brokerageId}/shipper-relationships/ routes to authenticate and POST customers.
The template Google workbook is available here and the user must create a copy of it in order to make changes.
Functions
The code is referenced from the google sheet via functions defined in the code editor. Adding a menu option to exercise the Shipwell API calls is a convenient way to test the functions created.
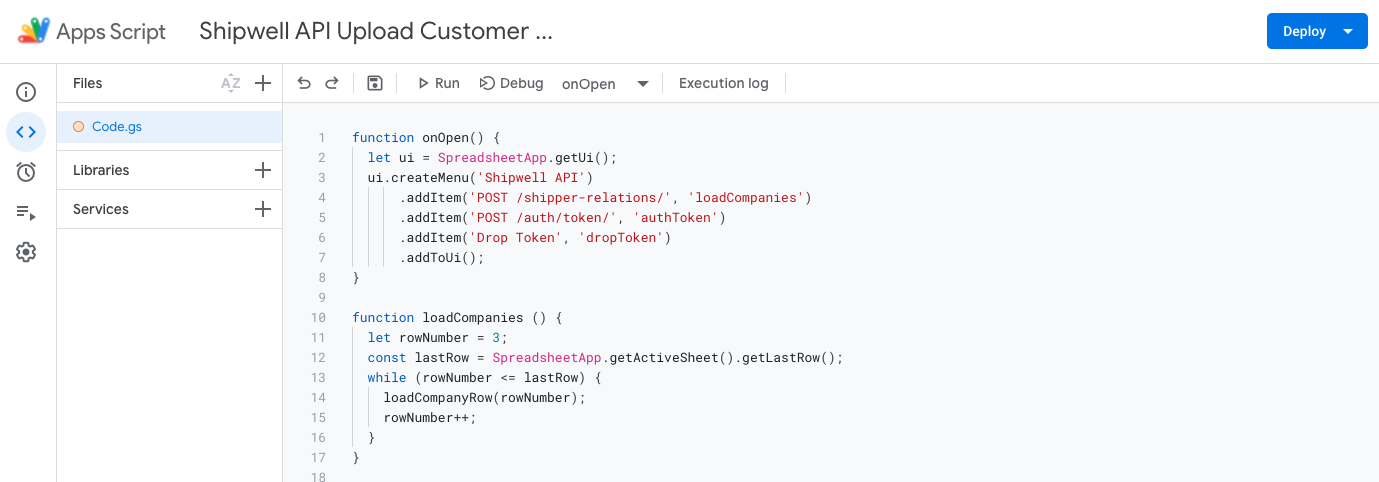
function onOpen() {
  let ui = SpreadsheetApp.getUi();
  ui.createMenu('Shipwell API')
      .addItem('POST /shipper-relations/', 'loadCompanies')
      .addItem('POST /auth/token/', 'authToken')
      .addItem('Drop Token', 'dropToken')
      .addToUi();
}
This will add a menu to the Google sheet when the sheet is opened. Shipwell API will be displayed on the menu bar and when selected will call either authToken() or loadCompanies() functions.
Authentication
Authentication is performed with a POST to /auth/token/ with the body of the request containing the username/password being authenticated. For additional information on this route visit the online documentation here.
In this example we’re using UrlFetchApp provided by Google to make REST API calls and the username/password is collected from specific cells in the Login sheet contained in the workbook. The SpreadsheetApp class is used extensively to get data from a sheet and set data on a sheet and here it’s used to collect the email from row 8, column 3 and the password from row 9 column 3 of the active sheet when the function is called.
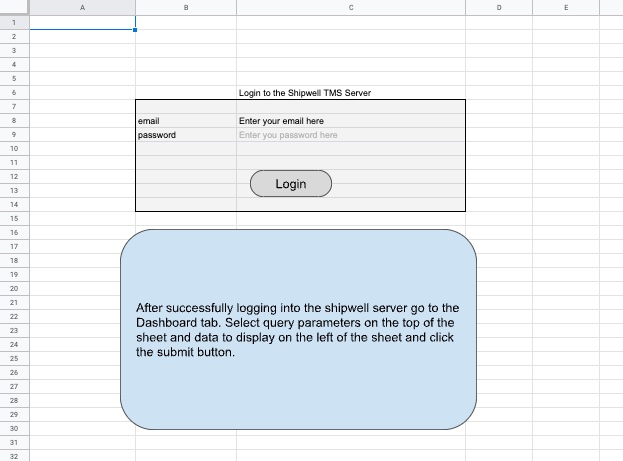
The Login sheet in the workbook provides prompts for the user to provide this information. On successful authentication the token returned is collected from the response body and saved as a script parameter. The Login sheet in the workbook provides prompts for the user to provide this information.
Note!
Make sure to press the return key after entering your password so the value is available when getValue is used to read the cell.
function authToken() {

  const url = "https://api.shipwell.com/v2/auth/token/";
  const data = {
    "email": SpreadsheetApp.getActiveSheet().getRange(8, 3).getValue(),
    "password": SpreadsheetApp.getActiveSheet().getRange(9, 3).getValue()
    };
  const config = {
    "method": "post",
    "payload": JSON.stringify(data),
    "headers": {
      "Content-Type": "application/json"
      },
    "muteHttpExceptions": false
    };
  const response = UrlFetchApp.fetch(url, config);

  const dataAll = JSON.parse(response.getContentText());
  SpreadsheetApp.getActiveSheet().getRange(9, 3).setValues([["..........."]]);
  PropertiesService.getScriptProperties().setProperty('myToken', 'Token ' + dataAll.token);
  PropertiesService.getScriptProperties().setProperty('brokerageID', dataAll.company.brokerage.id);

}
Things to note:
- UrlFetchApp requires the body of the payload of the request to be a string, not JSON, so use stringify to convert it before making the request
- The response is type text and needs to be parsed into a JSON object for easier querying
- MuteHttpExceptions when set to false will allow error responses from the server to be displayed and helps with debugging
-
The token and brokerageID are saved as a ScriptProperties() which are available for use in future API calls
Click the Login button to exercise the
authToken()function
Upload a Customer

The workbook includes a Customer Bulk Upload tab where each row contains the customer data to upload into the Shipwell platform and each column is a required field for the POST /brokerages/{brokerageId}/shipper-relationships/ route. There are many key:value pairs that could be included and the full payload is documented online here.
The code to iterate over the rows of customer data is straight forward.
function loadCompanies () {
  let rowNumber = 3;
  const lastRow = SpreadsheetApp.getActiveSheet().getLastRow();
  while (rowNumber <= lastRow) {
    loadCompanyRow(rowNumber);
    rowNumber++;
  }
}
The data starts on row three and getLastRow() is used to determine the last row of with customer data. The current row is passed to the loadCompanyRow(rowNumber) function and then incremented to get the next row.
Loading each row of customer data performs several actions:
- Get’s a row of data values from the google sheet
- Assigns the values to the appropriate keys in the payload
- Creates the url to the Shipwell API with the brokerageID of the user’s company that was collected during authenication
- Uses the url and passes the payload to create a customer
function loadCompanyRow (rowNumber) {
  let lastCol = SpreadsheetApp.getActiveSheet().getLastColumn();
  let companyRow = SpreadsheetApp.getActiveSheet().getRange(rowNumber, 2, 1, lastCol-1).getValues();
  SpreadsheetApp.getUi().alert('companyRow = ' + companyRow);
  const data = {
    "broker_imposed_credit_limit": companyRow[0][0],
    "company": {
        "primary_phone_number": '' + companyRow[0][1],
        "name": '' + companyRow[0][2],
        "primary_email": '' + companyRow[0][3],
        "shipper": {},
        "brokerage": {},
        "billing_address": {
            "address_1": '' + companyRow[0][4],
            "city": '' + companyRow[0][5],
            "state_province": '' + companyRow[0][6],
            "postal_code": '' + companyRow[0][7],
            "country": '' + companyRow[0][8]
            },
        "mailing_address": {
            "address_1": '' + companyRow[0][9],
            "city": '' + companyRow[0][10],
            "state_province": '' + companyRow[0][11],
            "postal_code": '' + companyRow[0][12],
            "country": '' + companyRow[0][13]
            }
      },
    "markup": { },
    "user": {
          "email": '' + companyRow[0][14],
          "first_name": '' + companyRow[0][15],
          "last_name": '' + companyRow[0][16]
        }
  };

  const url = 'https://api.shipwell.com/v2/brokerages/' + String(PropertiesService.getScriptProperties().getProperty('brokerageID')) + '/shipper-relationships/';

  const config = {
    "method": "post",
    "payload": JSON.stringify(data),
    "headers": {
      "Content-Type": "application/json",
      "Authorization": String(PropertiesService.getScriptProperties().getProperty('myToken'))
    },
    "muteHttpExceptions": true
  };
  const response = UrlFetchApp.fetch(url, config);

  const dataAll = JSON.parse(response.getContentText());

  SpreadsheetApp.getActiveSheet().getRange(rowNumber, 1).setValue([[dataAll.id]]);
}
Final Thoughts
This example is intended to provide insights into using the Shipwell API. Shortcuts were taken like hard coding values and no data validation. To customize this for your usage you should:
- Identify what data you would like to upload into the Shipwell platform
- Extend the const data section of the code to include the data you want to add. A sample shipperRelationshipsPayload() is included as a reference
- Extend the columns contained in this example with additional columns for each value