Getting Started
You can go from nothing to your first rates in minutes. Connect a carrier once and get your API token. From then on, every operation that carrier supports works through the same endpoints. See Supported Carriers for which operations each carrier offers. Connecting a carrier is a one-time setup per carrier account. If you work with a carrier under more than one account number, add each one.
Step 1: Confirm the carrier is supported
Check Supported Carriers to confirm the carrier you want is available, and which operations it supports. Don't see a carrier you need? Contact your Shipwell representative. New direct carrier connections are added regularly.
Step 2: Sign in to the Shipwell application
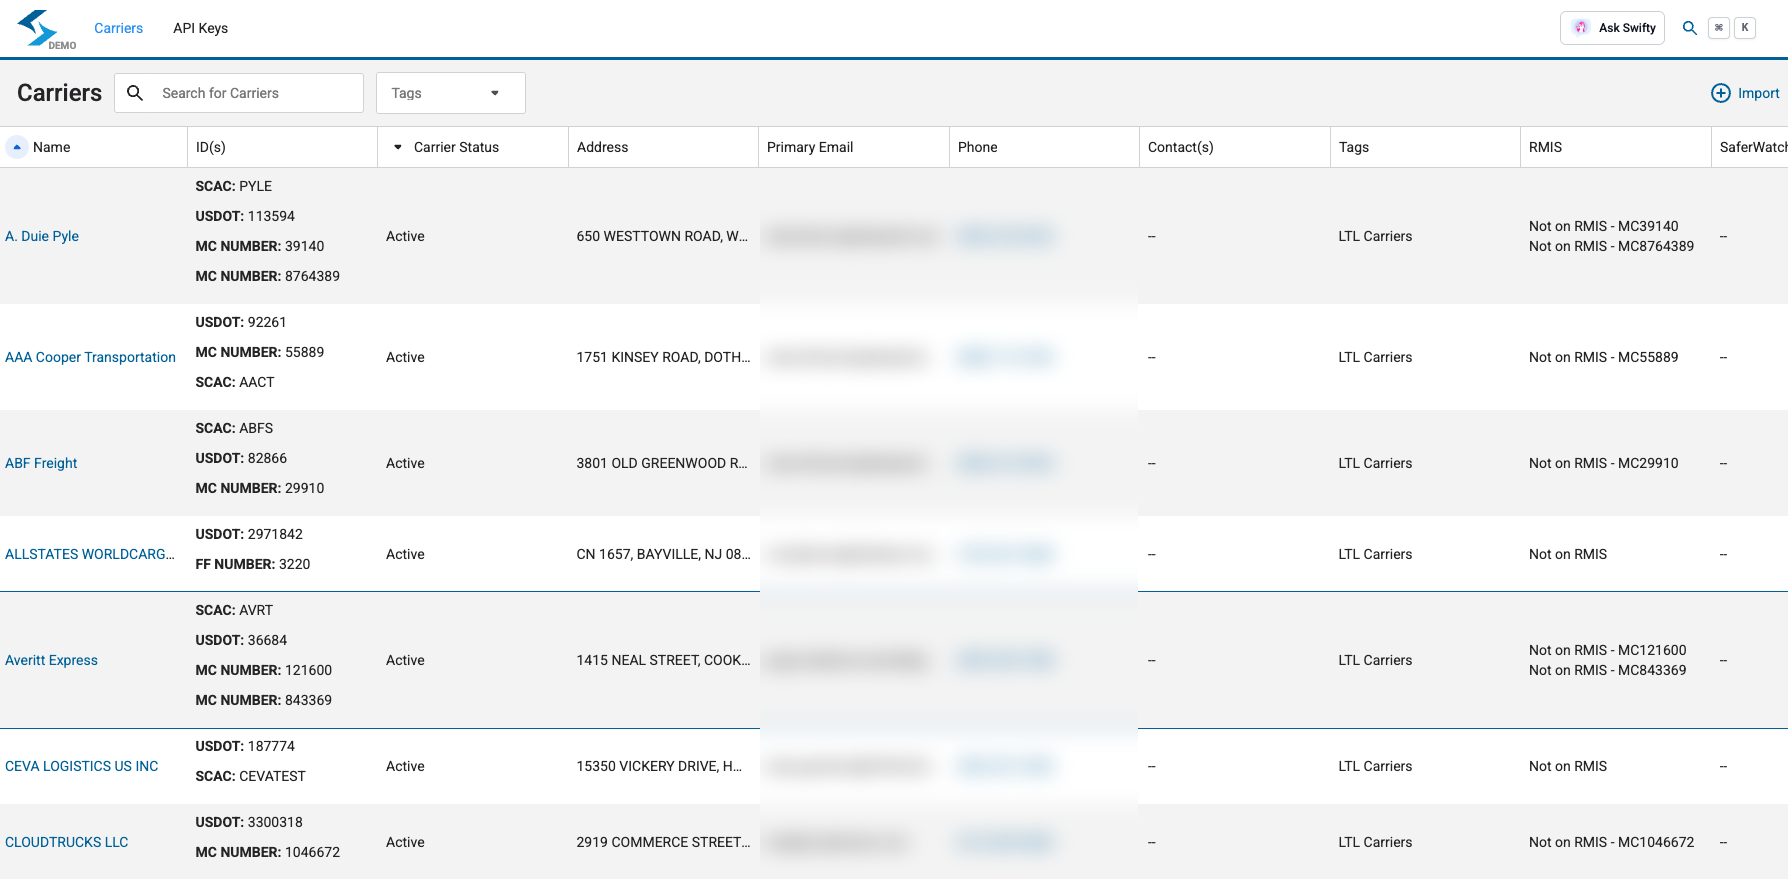
Your Shipwell representative sets up a user for your integration. It signs in to the Shipwell application with two menus, which are everything you need to get connected:
- Carriers , where you connect carrier accounts.
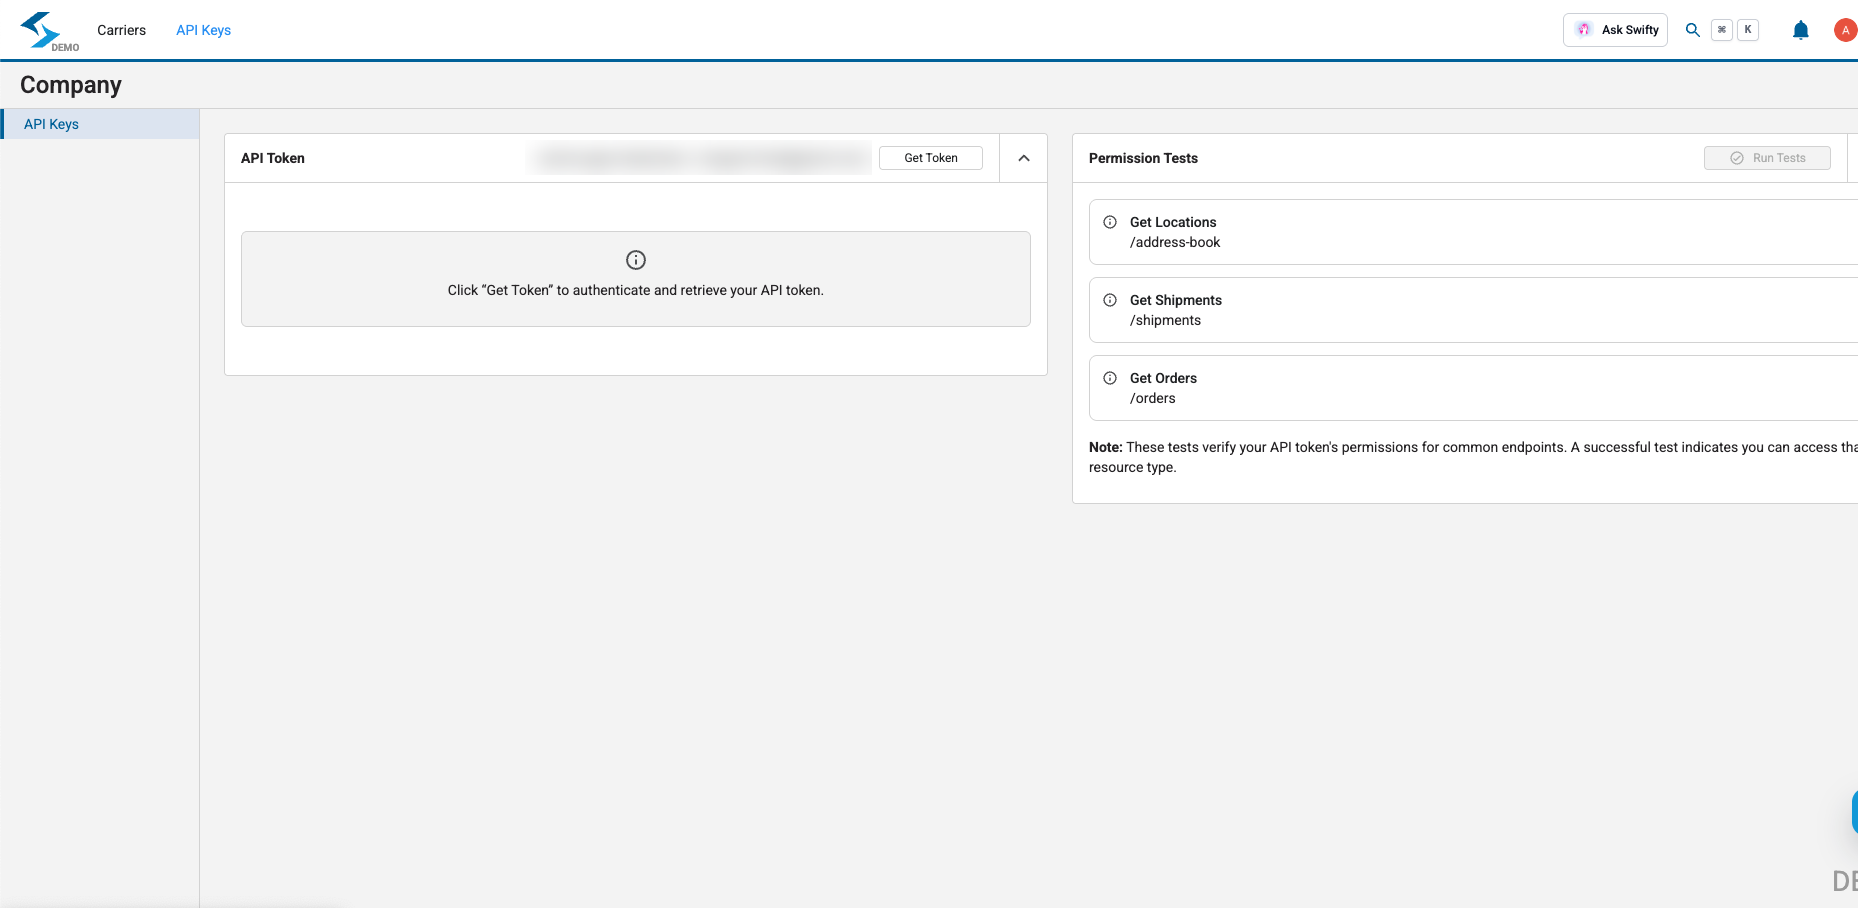
- API Keys , where you get the token your code sends.
Open Carriers and select the carrier you want to connect.
Step 3: Add the carrier account
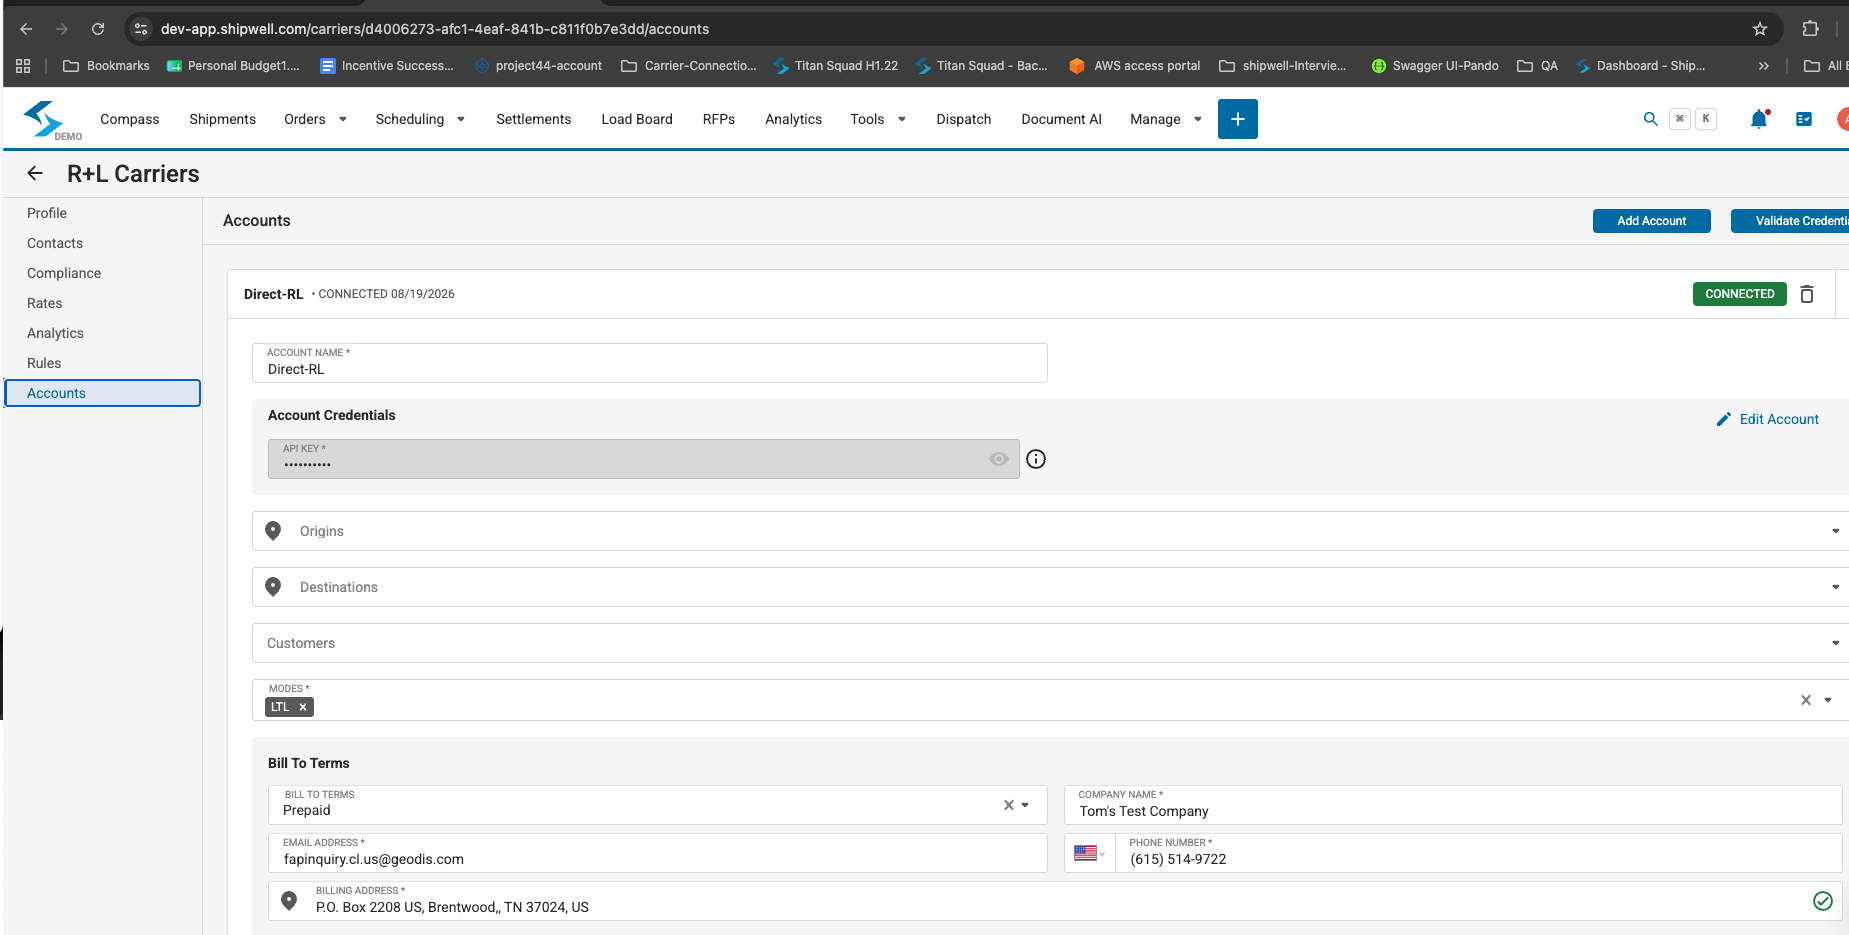
On the carrier's Accounts tab, select Add Account and fill in:
- Account Name : a label for this connection, useful if you have more than one account with the same carrier.
- Account Credentials : the carrier's own credentials. The fields match what that carrier issues. Duie Pyle, for example, asks for a MyPyle ID, an Account Code and a MyPyle password, while other carriers use an API key or a token. Select the ⓘ next to a field to see what it expects.
- Origins / Destinations / Customers : optionally limit this account to specific lanes or customers.
- Modes : which modes, such as LTL or VLTL, this account is used for.
- Bill To Terms : the billing terms, company, contact and billing address the carrier invoices against for shipments booked on this account.
Step 4: Validate the credentials before you save
Select Validate Credentials. Shipwell checks the credentials with the carrier straight away, before the account is added. A typo in a password or an expired account shows up here, not as a failed rate or booking later.
Once they validate, save the account. It shows as CONNECTED, and every Direct Carrier Connections endpoint can use it. You can come back at any time to update credentials, for example when a carrier reissues your password, or to add another account for the same carrier.
Note
The carrier credentials you enter here are used only by Shipwell to reach that carrier for you. Your integration never sends them. It authenticates to Shipwell with your own API token (next step).
Step 5: Get your API token
Open API Keys and select Get Token. Send the token on every request as Authorization: Token <user-token>.
Permission Tests confirms what the token can access. Select Run Tests to check it before you write any code. See Authentication and Environments for more about tokens, sandbox and production.
Step 6: Make your first call
With a carrier connected, request rates. You don't have to name the carrier: a rating job quotes every carrier eligible for your account unless you narrow it with capacity_providers.
Example request
curl --request POST 'https://sandbox-api.shipwell.com/rating/jobs' \
--header 'Authorization: Token <user-token>' \
--header 'Content-Type: application/json' \
--header 'Idempotency-Key: 6f1c2a4e-first-rating' \
--data-raw '{
  "modes": ["LTL"],
  "equipment": [{"equipment_type": "DRY_VAN"}],
  "stops": [
    {
      "sequence_number": 1,
      "location": {"line_1": "515 Congress Ave", "locality": "Austin", "region": "TX", "postal_code": "78701", "country": "US"},
      "contact": {"company_name": "Acme", "first_name": "Dock", "last_name": "Team", "phone": "+15125551234"},
      "requested_window": {"earliest": "2026-12-01T14:00:00Z", "latest": "2026-12-01T22:00:00Z"}
    },
    {
      "sequence_number": 2,
      "location": {"line_1": "4340 Directors Row", "locality": "Houston", "region": "TX", "postal_code": "77092", "country": "US"},
      "contact": {"company_name": "Beta Receiving", "first_name": "Receiving", "last_name": "Desk", "phone": "+17135554500"}
    }
  ],
  "handling_units": [
    {
      "quantity": 1,
      "freight_class": "70",
      "weight": {"value": 500, "unit": "LB", "qualifier": "PER_ITEM"},
      "dimensions": {"measurement_type": "DIMENSIONS", "unit": "IN", "length": {"value": 48, "unit": "IN"}, "width": {"value": 40, "unit": "IN"}, "height": {"value": 50, "unit": "IN"}}
    }
  ]
}'import time
import requests
BASE = "https://sandbox-api.shipwell.com"
HEADERS = {"Authorization": "Token <user-token>"}
job = requests.post(
f"{BASE}/rating/jobs",
headers={**HEADERS, "Idempotency-Key": "6f1c2a4e-first-rating"},
json={
"modes": ["LTL"],
"equipment": [{"equipment_type": "DRY_VAN"}],
"stops": [
{
"sequence_number": 1,
"location": {"line_1": "515 Congress Ave", "locality": "Austin", "region": "TX", "postal_code": "78701", "country": "US"},
"contact": {"company_name": "Acme", "first_name": "Dock", "last_name": "Team", "phone": "+15125551234"},
"requested_window": {"earliest": "2026-12-01T14:00:00Z", "latest": "2026-12-01T22:00:00Z"},
},
{
"sequence_number": 2,
"location": {"line_1": "4340 Directors Row", "locality": "Houston", "region": "TX", "postal_code": "77092", "country": "US"},
"contact": {"company_name": "Beta Receiving", "first_name": "Receiving", "last_name": "Desk", "phone": "+17135554500"},
},
],
"handling_units": [
{
"quantity": 1,
"freight_class": "70",
"weight": {"value": 500, "unit": "LB", "qualifier": "PER_ITEM"},
"dimensions": {"measurement_type": "DIMENSIONS", "unit": "IN", "length": {"value": 48, "unit": "IN"}, "width": {"value": 40, "unit": "IN"}, "height": {"value": 50, "unit": "IN"}},
}
],
},
).json()["data"]
job_url = f"{BASE}/rating/jobs/{job['id']}"
while not job["is_terminal"]:
time.sleep(5)
job = requests.get(job_url, headers=HEADERS).json()["data"]
rates = requests.get(job_url, headers=HEADERS, params={"include": "rates"}).json()["data"]["rates"]
for rate in rates:
if rate["charges"]:
print(rate["carrier_name"], rate["charges"]["total_charges"]["amount"], rate["id"])The response comes back straight away with "status": "PROCESSING" and "is_terminal": false. Rates arrive as each carrier answers: read GET /rating/jobs/{id}?include=rates at any time to see the ones in so far, and poll until is_terminal is true for the full set. Both stops carry a contact, so any rate you get back can be booked with its id alone. Rating walks through the response.
Next steps
Pick a rate and dispatch it with its id. That single field is the whole booking request.